Showing posts with label clothing. Show all posts

Sunday, January 8, 2012

2 New A-line Skirts, made to order.

A very patient friend put in an order for 3 A-line skirts for work. She picked the fabric and I made them up. Unfortunately the Christmas Craft Rush interfered and the skirts were delayed terribly. I'm hoping (!) to turn over a new leaf and try to do orders right away instead of allowing them to get derailed by other projects. Wish me luck! The first one I did manage to get out to J before Christmas, a stunning teal corduroy, thin wale, by Robert Kaufman I think, with a bit of stretch. Lovely for a skirt and so vibrant. These 2 are a quilting cotton, Modern Martini by Amy Butler and Rashida Coleman-Hale's linen/cotton blend of a lovely graphic pattern called I Heart Wavy Lines. All terrific picks for the versatile a-line. If you are wondering whether I take orders I do but for now it's A-line skirts only and we're off on holiday soon so I can take orders but they can't be filled until the end of March/early April. I'm really not that reliable ;o)

Wednesday, October 12, 2011

Matchy-Matchy

Another a-line skirt! These are a very quick skirt to make and a nice staple to the wardrobe. 2 twirly girl skirts accompanied mama's a-line and all 3 girls were very excited to dress matchy-matchy! I've recently made some twirly girls with a corduroy top layer, cotton under-layer that look like so much fun to wear - while being a bit warmer too! Twirly Girl skirts will be available this Saturday at the KidzSwap Meet. Stay tuned for photos!

Friday, July 29, 2011

Square Neck Summer Dress - Happy Homemade Vol 2

Another lovely pattern and so quick and easy. The button loops at the back made for an easy closure - no button holes required.


Tuesday, May 31, 2011

Simplicity 3835 - awesome top!

Many of my favourite blog-sewers have recommended this top and now I know why. It's very fast and fits really nicely and it also comes in tunic and dress lengths. I can't wait to make another one in dress length next. I've had the pattern since last fall but was finally motivated by this one to get going and give it a try - I was also, most likely looking for a diversion from the other things on my sewing list - like a grad dress, curtains, quilty pants and a pair of room shoes for a friend... guess I better go and get those done!

Wednesday, May 11, 2011

Twirly Girl Skirt with Olivia!

Here is a fun skirt for a birthday girl today! Luckily her birthday landed on Kids Clothes Week Challenge!! Another thing that landed around here was a snow blizzard this morning! Not many of us are impressed - probably just the 5 and under crowd think it's neat. Luckily it has melted and turned to rain which is greatly needed - haven't had any rain yet this spring!

Monday, May 9, 2011

Kids Clothes Week Challenge - Dad's made-by-me sweater gone wrong...

I like to think that every knitter worth his/her salt has one of these, misshapen sweaters in their repetoire. I knit this for my husband a while ago and it took forever and it was too big and we tried to shrink it but it seemed to be short in the back and long in the front and it never seemed to look right. So, I decided to chop it into a sweater for our five year old. I didn't think I could actually cut into it - pretty scary and it was so much work to knit, I think it was 2 years in the making! But, better to use it than to throw it away! Now it looks great as a tunic sweater. I kept the neck line which, might have been a mistake as it is a bit of a big boat collar now. I'm also thinking it would make a great sweater dress for my niece after Finn is finished with it! I have so much overdue sewing on my plate this week, I sure hope I find the time to sew for KCWC!


Sunday, January 2, 2011

A Barcelona Skirt

Happy New Year!
Sorry for the lack of posts. I think that's the trend around here. I've sewn so many things but my documentation is falling far behind! Here is the skirt I made to wear for Littlest (like I needed another project at that time!). I love this Tufted Tweets fabric - very vibrant. I was planning on making these skirts for that next trunk show but not many people could tell these were couches. I guess the graphic is a bit of a puzzle for the eye - or couches on a skirt are just so unexpected perhaps! The Amy Butler pattern is excellent and easy and belongs to my good friend K and she had it for a whole year unopened so I asked to borrow it! Hoping to repay her soon with a skirt of her own!

Wednesday, November 24, 2010

Women's Long Sleeve Hoodies for the Littlest

I've made a small stack of one-of-a-kind embroidered birds on fabric paint-stamped birdcages. They're all black, women's (sorry guys!), American Apparel (because they're made in USA), long sleeve hoodies. I've been test driving mine since the spring and I'd wear it every day if I could, it's that comfy and washes well to boot. If you'd like one or like to see them just let me know or come next Saturday to 17 Arnheim for the 12th Annual Littlest Arts and Craft Fair - the best one in town in my opinion! There's my sales pitch for the day - stay tuned for more. The next big news is that, after a dry spell of not finding just the right kind of apron fabric since IKEA discontinued my favourite linen/cotton blend, I will finally have Cafe Aprons again! Hooray!

Sunday, November 21, 2010

Pattern No. 12 - Jacket with Hood and Big Pockets

I bought this Japanese Pattern book in February (yes, 9 months ago folks!) while we were in Portland, Oregon. The Hooded Jacket in wool was so great, I had to make it - obviously I was in a big hurry? I also bought some lovely (local) wool from Pendleton Mills in Portland too. The pattern was very easy, I think I sewed it up in one evening, and then the buttons and hand sewn hem the second evening. Of course I ask myself, as the count down to The Littlest Arts and Craft Fair is on, and the frantic sewing frenzy begins, what the heck am I doing sewing this treat of a jacket for me at this time of year??!! Ah well, must be a form of procrastination! So, if you don't get something handmade from me this year for Christmas, it's because I was busy sewing for myself! He he...


Sunday, April 5, 2009

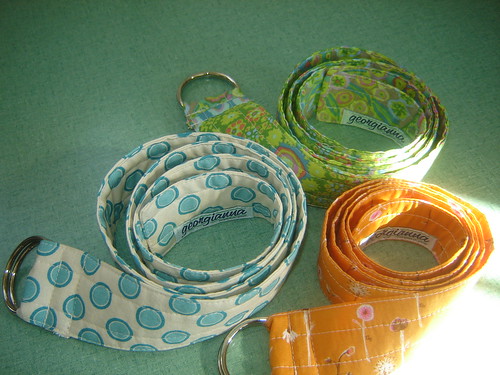
Anna's Belt

My sister in law (that's fun to say, she's my first and only sister!) came back from holidays in Winnipeg last year with the cutest fabric belt. I've finally managed to find D-rings and try making some of my own Anna Belts. They're really nice, another great way to wear fun fabric patterns - a quest I'm always on. I just made one for our good friend DH for his birthday with faux bois fabric (I'll have to get a photo!). I'm making a bunch for the Spring Trunk Show which will now be on April 26th at the Chocolate Claim from 10am to 4pm - hope you can come!
I'll try to paraphrase how I made these - I did experiment with different widths until I got it right. Another thing to be aware of, if you're buying D-rings online (i.e. sight unseen), just wait 'til they arrive before cutting fabric! Different companies measure D-rings differently, some from the outside of the ring, and some from the inside. So here is my first mini-tutorial:
1. Fabric: Measure the inside of the D-ring, multiply this by 2 and add 1/2 an inch. That is the width of your strip of fabric when using 1/4 inch seam allowance, the length could be 45 to 48 inches, your choice. My D-ring was 1 3/4 inches, my fabric strip therefore was 4 inches.
2. Interfacing: Cut a piece of fusible interfacing - use the fusible fleece interfacing, a fairly stiff/thick interfacing that irons on. The width of mine was 1 and 5/8 inches; roughly an 1/8 inch narrower than the finished belt width. Cut it the same length as the belt fabric.
3. Ironing: Iron the fabric in half, lengthwise, wrong sides together. Open this fold and press a 1/2" hem at one end. Align the fusible interfacing, fusible side down along the crease lines at the end and along the length. Fold over the fabric, making a sandwich and press. Open up and press the long edge hem over the non-fusible side of the interfacing, should be a healthy 1/4 inch. Flip belt over and press the other long edge over the whole belt, then open up the belt and tuck the hem in and press one more time. (ok, sorry, I really should have some photos shouldn't I?!).
4. Sew across the hemmed edges starting at the belt end, turn and go down the long edge. Choose a matching thread colour if possible. The other end of the belt is raw edges.
5. Sew topstitching lines down the length of the belt 1/2 inch in from the edges or at whichever intervals you choose, I suppose you could even sew abstract wiggle lines up and down the belt... I'll have to try that!
6. Serge (or zig zag) the raw end of the belt, turn under 1/4 inch, thread D-rings and sew in D-rings, maybe with a 3/4 or 1 inch over lap of belt fabric. I try to sew as close to the D-rings as possible and then a second seam along the tab end so it doesn't stick up too much.
Finished!
Disclaimer - those width measurements may or may not work for you, I'm not a precision sewer like most quilter sewers out there are! And now that you've waded your way through that, here is a good tutorial for a similar belt.